Standing Seam Façade Panels
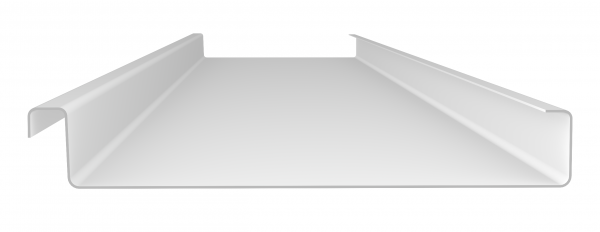
Standing Seam façade panels are a simple, clean and elegant system which can be tailored to suit both heritage style and contemporary style designs, whether it be Residential, Commercial or Industrial.
All Standing Seam cladding panels are continuously rollformed, allowing us to form panels as long, or as short as you like.
Each Standing Seam panel has a thin, flat, longitudinal tray, with an over and under lap either side which, allows for the seams to be mechanically closed over and locked into position.
A solid plywood substrate is required for all Standing Seam Façade applications.
All fixings are concealed, with our unique clip design which also allows for expansion & contraction between the panels.
Standing Seam is widely used for its top performing attributes, weather resistance to harsh climates and its ability to create watertight solutions on roof and façade applications, even in areas subject to coastal spray, snowfall, high winds and heavy rain.
Download the Interactive Standing Seam Panel file (Adobe Acrobat Reader Required)
Characteristics
- Concealed fix system
- Attractive longitudinal joints
- Versatile and lightweight
- Continuous long length panels
- Modern, clean finish
- Flexibility suitable for all architectural designs
- Fine, defined seams for a slimline look
- Blends traditional and modern architecture
Benefits
- Minimal maintenance requirements
- Easy installation via a concealed fixing clip system
- Allows the building to breathe via a naturally ventilated air gap
- Stable for large wind resistances
- Cost effective due to ease of install
- Low risk of water penetration
- Lightweight system
Design & Specification
- Horizontal / Vertical / Diagonal Panels
- Tapered & Splayed panels
- Staggered & brick pattern options
- Fully customisable panel widths
- Endless possibilities for implementing design ideas
- All types of Roofs & Facades
- All Shapes – Flat, curved, concave, convex, conical, domes
Uses
- Commercial
- Industrial
- Residential
- Interior
- Exterior
- Roofing
- Wall Cladding
- Facades
- Soffit Linings

Smith Street, Lorne
Installation
Standing Seam installations require a continuous ventilation gap beneath the plywood substrate. 20mm for all facade and cladding projects and a 40mm continuous air gap for roofing installations. Ventilation is recommended to remain at the top and bottom of all panels where possible.
All panels are to be laid on a solid substrate, which is then wrapped in a vapour barrier membrane, panels are laid directly over the membrane and clips are used to fix the underlap with the accredited fasteners.
The following panel, beginning with the overlap is then placed over the underlap, concealing the fixing clips and the seam is mechanically closed with a manufacturer approved tool.
If your project requires an installation of panels higher than 30 metres in the air, or if it is in a high speed wind area where winds may reach speeds above 170km/h, please contact Architectural Panel Systems.

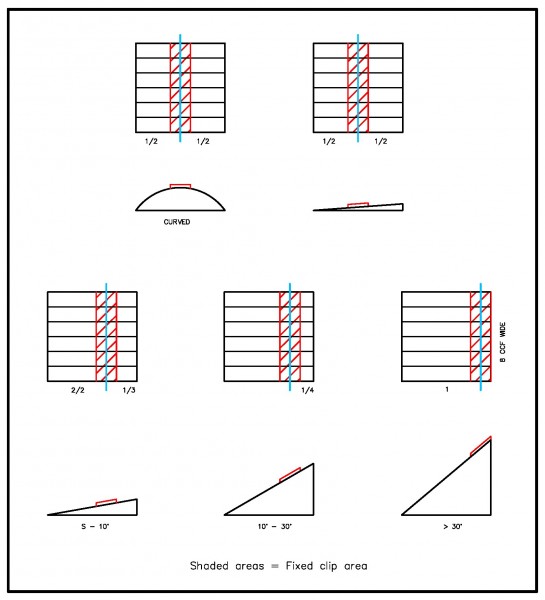
Vertical Installation – A fixed area is created with 5 fixed clips at the top of the panel and then sliding clips are distributed
Horizontal Installation – A fixed area is created with 5 fixed clips in the middle of the panel and the sliding clips are distributed.
Curved Installation – Curved walls can be achieved in concave, convex, conical and dome applications. Subject to panel lengths, material selection, etc.
Panel Width – No minimum – 600mm maximum.
Standard Widths – 225mm, 255mm, 325mm and 425mm (25mm Rib Height). Thinner and wider panels are available upon request for special project requirements only.
Laying Direction – Vertical, horizontal and diagonal orientations.
Rib Height – 25mm Standard. Custom rib heights are available upon request.
Panel Length – Panels are available up to any length required, subject to material selection. We recommend contacting Architectural Panel Systems for further information on material selection and maximum panel lengths for your project, as all materials will react differently depending on the length supplied.
Panel Height – 28mm depth overall from base of panel, to top of rib.
Material Thickness – 0.55mm minimum to 1.0mm maximum. *Material thickness is dependent on material chosen and panel width required.
Fixing Requirements – All panels are to be fastened using the approved clips, fixing through the underlap and using the following panel to hide the concealed clip. The approved fasteners and clips must be used on all installations. To complete the installation, all seams are required to be mechanically closed either once for a single lock or twice for a double lock. Single lock and double lock may be required in certain circumstances.
Substructure – Wall Cladding/Facades – 15mm Plywood, covering the entire area where cladding is required.
Substructure – Roofing – 19mm Plywood, covering the entire area where roofing is required. An anti abrasive breathable vapour barrier membrane is required between the plywood substrate and the Standing Seam panel. Each sheet of plywood must rest on at least 3 bearing structure elements. Plywood substrate must be free of any protruding elements that may affect the face of the installed panel.
Flashing – All associated flashings are available directly through Architectural Panel Systems. We recommend all installers to use the traditional concealed fixing method with all flashings to provide a high quality finish. The concealed fix method also allows for thermal expansion and contraction.
Panel Finishing – Architectural Panel Systems recommends all panels are installed and supplied with a stop end or over fold at the top and bottom of the panel for all applications. This will stiffen the panel face, remove any oil canning and also provide a much cleaner, flatter surface finish on all panels.

Corner Panels – The benefit of using the Standing Seam system is that all panels can be folded and mitred around internal and external corners, eliminating the need for unsightly flashings. All corner panels can be custom fabricated to site specific measurements.
Transversal Junctions – In applications where the length of the sheet required exceeds our recommended length for that specific material, the panels will require a joint in the sheet using a transversal junction. 3 recommended techniques exist, depending on the pitch of the roof.
Step / Drip Join – This joint is suitable for roof pitches of 3 degrees (5% or more). The step height required will be a minimum of 80mm.
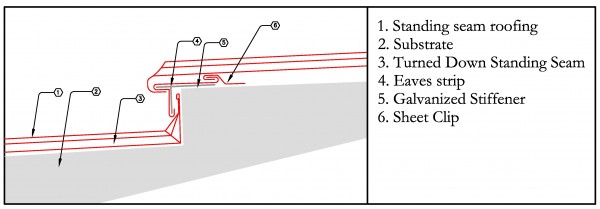
Double Welt – This joint is recommended for roof pitches of 8 degrees (15% or more). The minimum length of the overlap should be 200mm, with a securing clip at the top. This overlap can be increased, subject to climatic conditions such as rainfall and wind severity.

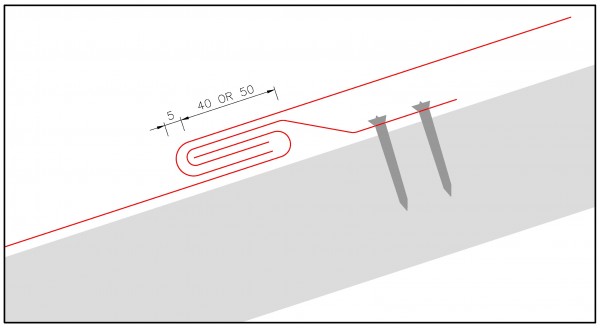
Single Welt – This joint is recommended for roof pitches of 25 degrees (47% or more). The single welt requires an overlap of 50mm. We recommend using the double welt over the single welt for Standing Seam where possible, as it will provide much greater water and wind resistance.
Minimum Pitch
60 – 90 Degrees (Single Lock Walls)
3 Degrees or 5.2% (Double Lock Roofs)
Finishing Details – A manufacturer approved profiling / seaming tool is required to close the longitudinal seam joints.
Fixing Clip System
Standing Seam clips are designed to be a dual purpose clip. They ensure the mechanical resistance of the panels fixed to the substrate while also allowing for free expansion and contraction of the metal. All clips are manufactured from Stainless Steel for long lasting, high performance. The sliding clips have an adjustable, moving component which is 0.4mm thick and a 70mm long slot which allows for unobstructed movement of the panel when expansion and contraction is required. The sliding component of the clip must be positioned correctly within the slot at the time of installation. Generally, the sliding component is required to be positioned as close as possible to the middle of the slot. The clips resistance to tearing is 50 daN.
Both fixed and sliding clips are to be used to allow for thermal expansion and contraction. This must be allowed for during installation by the contractor.
Clip Fasteners – It is recommended that all clips are to be fixed using the approved fasteners. We do not recommend that nails are used for fixing as they offer significantly less resistance. In the circumstance that nails are required, it is recommended that ring shank nails are to be used. 3 fasteners per clip is recommended on all installations.
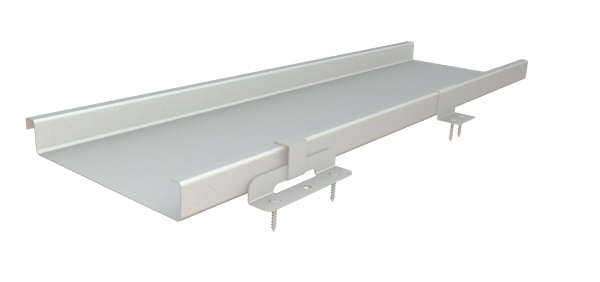
Clip Spacing – Clips are required to be spaced approximately 330mm centre to centre on the main part of all installations. Around the perimeter of the installation, it is recommended that clips are fixed at 165mm centre to centre. For detailed clip fixing guides and diagrams, please contact Architectural Panel Systems.
Find out more about Standing Seam Roofing by downloading the Standing Seam Brochure
For detailed installation guides please download the Standing Seam Facade – Installation Guide
For material weight and specifications, please download the Standing Seam Specification Table
- Smith Street, Lorne
- The Sands Boulevard, Torquay
- Boston Road, Torquay
- Allen Street, Lorne
- Boston Road, Torquay
- Boston Road, Torquay


